What’s an SSL (Secure Sockets Layer) ‘https’ certificate?
SSL certification is a special communication protocol that protects the information being transmitted across the web. It creates a secure connection between a person’s web browser and the server of the company they are interacting with, so all communication between the two is kept private and secure, safe from eavesdropping, and cannot be stolen or changed in transit.
All the information that is passed through this secure connection is encrypted before being sent, and decrypted only when received on the other end. If someone manages to access the information en route, it is useless to them because they cannot read what it says.
Google has lead the fight to get all websites to add a Secured Sockets Layer – ‘SSL’. As of the first of 2018 Google Chrome (and many other browsers) will display a ‘Not Secure’ warning on websites without valid https security. If your website says Not Secure, you stand to lose customers trying to locate your website.
*** Admin Update
Here’s a couple of supportive articles by, Search Engine Land and , dated Feb, 2018 that further supports the Google announcement to secure your SSL https install before Sept 2018…
And here is the article from Web Pro News…
WordPress is also limiting critical features (such as API authentication) to only those websites who have implemented an SSL Certificate. Of several million websites that get hacked in one year, almost 75% of those sites were based on WordPress. This is not surprising because of the massive number of WordPress-based websites that exist and because every plugin that is installed is a potential access point for hackers to gain entrance.
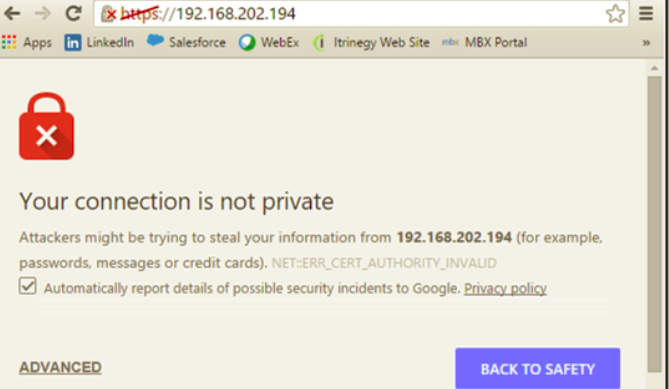
Most all search browsers will begin to show this ‘warning sign’ like this to your potential customers that are trying to visit your website if you do not have SSL/https.
The most unfortunate thing about not having an SSL certificate and a secured https green padlock is the fact that when one of your potential customers (or friends if it’s your own personal site) sees this warning sign, they’ll otherwise be thinking that your website got hacked (or something like that) and will feel uncomfortable about proceeding to your site.
Just look at your options on this warning sign image… You can go to the ‘Advanced’ section, where most folks won’t know that this is where one goes to get to the [your] website. Or, the option to go ‘Back To Safety’. These options are not very fair and misleading, yet that’s the choice you as a website owner is left with if you hadn’t secured your SSL https certificate.
Why is it Important to have an SSL Certificate on Your Website?
 It’s critical that you secure financial data and even basic personal information such a person’s name, address, phone number and email addresses.
In fact, your website needs to be fully secured no matter how much or how little information you gather from your visitors.
When your website has an SSL Certificate installed your visitors will see a small padlock in front of your URL. Your URL will also start with HTTPS instead of HTTP. The S on the end stands for Secure. Depending on the internet browser they are using, there may also be a green bar and the word Secure in front of your domain name.
How to Install an SSL Certificate on Your Website?
***
If you’d prefer, let us install your SSL certificate and save you the hassles…
Contact us with the form at the very bottom of this page.

***
SSL ‘https’ install Checklist
Buying Certificates (free vs. paid)
Before taking the steps involved with installing an SSL certificate on your website, be sure to check directly with your existing service provider hosting your website to determine if you have a certificate available or if there are any limitations to installing your own SSL.
Note: Some shared cpanel sites do not allow third party SSL certificate installs. As such, one may be required to purchase their SSL certificates via the hosting site and have them install it.
eg., Hostgator allows third party SSL but will charge you a fee to install it… (they’re trying to get you to purchase the SSL cert through Hostgator)
For most installs, refer to each hosting vendor as to how to proceed with ‘activation’ of your newly installed SSL certificate on the cpanel or plesk. Most all hosting companies provide customer service with a detailed SSL install instruction page (document).
*** Free ***
If you’re hosting your website with a hosting service, check to see if you’re existing plan already offers a free SSL certification. Cpanel offers such on many hosting plans.
Note: If your website is build on a ‘third party’ platform like… Wix, Weebly, SquareSpace, or other similar services, you may be immediately eligible to switch over to an SSL https secured site.
Note: If you are eligible for an automatic SSL install on your site then skip down this page to the Google accounts set up after your SSL is installed.
LetsEncrypt – as a free option
(sometimes available within your cpanel as a free option)Note: verify that the LetsEncrypt certificate has auto quarterly updates for their certificate updates.
(If your free LetsEncrypt does not automatically update each quarter then you’ll have to maintain and do updates yourself)
 *** Paid ***
We recommend GoGetSSL.com to purchase a Comodo SSL certificate.
What Types of SSL Certificates are available?
What Are the Differences between SSL Certificates?…
– Domain Validation (DV)
A Domain Validation SSL certificate is… A domain validation SSL certificate available for all individuals, businesses, sole traders and private customers. There is no paperwork; you need to pass validation via email or alternative validation methods only. It takes 3-8 minutes to receive issued SSL after passing verification. It’s a basic ‘green padlock’ certificate.
– Business Validation (BV)
A Business Validation certificate is… A Business/Organization SSL certificate. It allows end-users can verify business name, an address of a company and phone number of the website they are visiting. That boost conversions and increase sales. Domain validation SSL certificates check domain ownership, yet, anyone can be the owner and put any company in contacts. Business SSL verifies all that information and makes it safe to use. However, if you might find that a DV will serve the SSL compliance just fine.
– Extended Validation (EV)
An Extended Validation certificate is… The most amazing feature is Green Address Bar with verified company name coming with every Extended Validation certificate. An extended validation SSL certificate requires a longer checking process comparing to Domain and Business validation certs, but it might be worth it, as you will get the highest possible trust level from all visitors and customers. All EV certs come with Dynamic Site Seal logo for instant positive attention and up to $1,750,00 warranty level. Certificates we provide issued by most trusted vendors globally as we do care about the quality.
– Wildcard Validation (WV)
A Wildcard Validation certificate is… Wildcard SSL certificates become more popular today as they have strong reputation of a great cost-savers since can protect unlimited sub-domains within same domain instead of purchasing multiple single domain certs. Most Wildcard certificates support unlimited server licensing and allowing installation to as many servers/devices as you want in versatile combination of sub-domains. Unlimited free reissues comes with every purchase.
***
If you’d prefer, let us install your SSL certificate and save you the hassles…
Contact us with the form at the very bottom of this page.
***
Installing Your SSL Certificate (via cpanel or plesk hosting panels)
In both cpanel or plesk administration panel, look for the icon ‘SSL’ usually located under your Security Section.
You’ll either, install your purchased ‘certificate’ and ‘key’ from a third party, or secure your SSL ‘certificate’ and ‘key’ and ‘verify’ that the SSL certificate was accepted by your hosting server…
Note: Verify that both, ‘Force Domain Encrypt’ and External Re-write’ buttons are selected within your cpanel or plesk as you proceed with your SSL install.
WordPress follow-ups after SSL certificate installed on your website hosting service.
WordPress plugin to handle updated http to https redirects/replace…
Plugins include:
> Really Simple SSL (plugin) by Rogier Lankhorst – Activate
&
> Better Search Replace (plugin) by Delicious Brains – Activate
Note: Better Search Replace is under ‘Tools’ in WP dashboard
Note: set http and https fields at the top for top level domain name
Note: Run BSR as ‘dry run’ first to determine files needing updates
Note: after ‘full run’ – log back in WP and deactivate BSR plugin
After BSR has completed migration, go ahead and ‘(Flush) and Activate SSL’ in Really Simple SSL plugin.
(note: the Really Simple SSL screen remains above in Dashboard while working within BSR)
Note: Check for Mixed Media Conflicts
Important… Verify the ‘green padlock with https’ as your new URL
Deactivate Better Search Replace (note: you can even remove BSR from plugins console)
Other SEO considerations…
– New HTTPS version canonicalization
Text and Verify that the canonical tags (eg., www, et. al.) on the pages are pointing to its HTTPS URLs
Post SSL installation Checklist:
Note: Have all of these Google Accounts Open Prior to https updates within Google accounts…
eg., Gmail, Google My Business, Google Search Console, Google Analytics
 Google Analytics (Home Page for the account you want to change http to https)
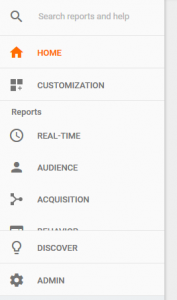
– Lower Left hand Column > select > Admin (gear icon)
– Middle Column under Property > select > Property Settings section (center top selection under ‘Property’)
– Change > Default URL from http// to now be https//
… then > Properties Settings
… also in > View Settings section (right hand selection under ‘View’)
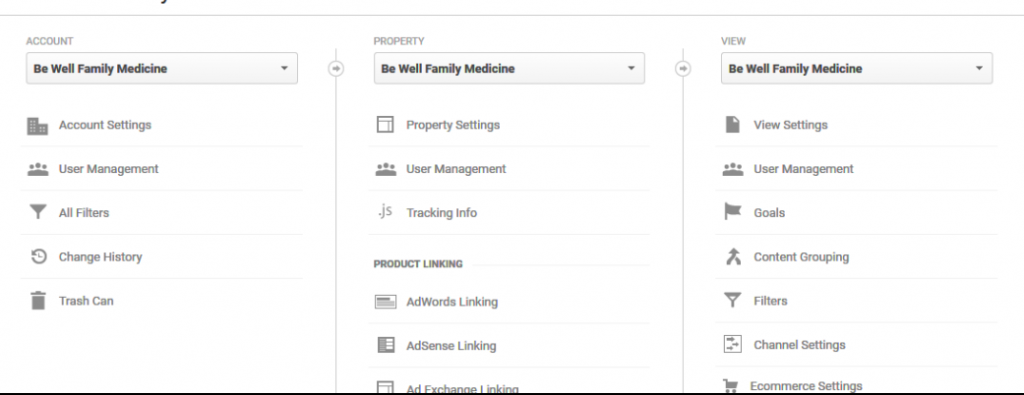
Next change in Properties and View the drop down box from http to now be https and Save.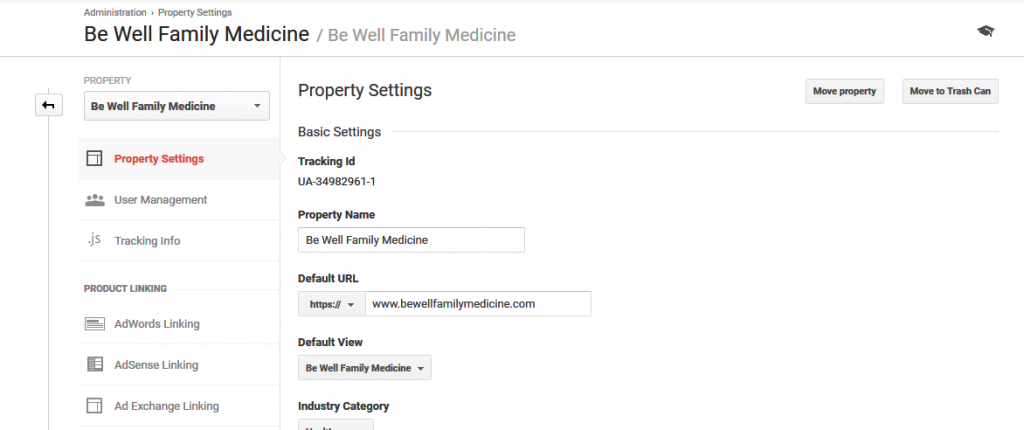
Next… Go To Google Search Console (for this website account)
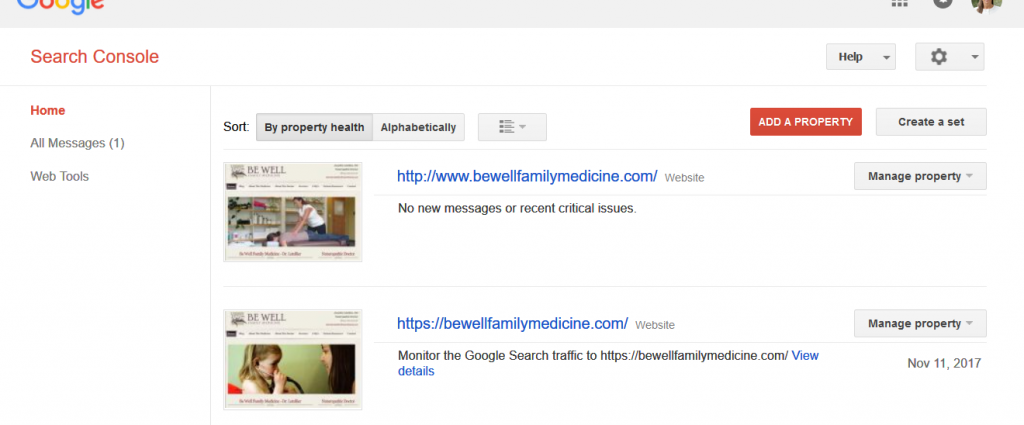
– On homepage > Select > Add a Property
– ‘add’ this [your] website with > https// (website)
(hint: go to website itself in a search browser and grab the URL with the https URL there)
– Site verification
Note: sometimes Google will automatically verify via Google Analytics to verify your site.
– If you need to verify, go to verification within Search Console and use the Google Analytics as your way to verify…
Once selected and Saved you should get a Congratulations page.
Note: Go through verification process… If Analytics not mentioned first then select ‘Alternative Methods’ tab.
Usually select Google Analytics since this property was just updated in Google Analytics.
Check for green success checkmark win ‘Congratulations’. Hit Continue link.
– Note: May have to verify with other options to create a ‘Successful’ response from Google.
– Now navigate back to the Search Console Home page and > Select > Submit Sitemap.
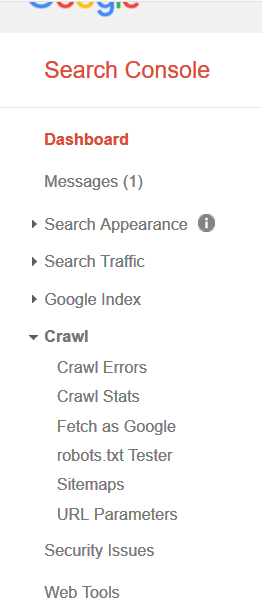
Test and create new xml sitemap for this new https property
– Left column under >Crawl ->Sitmaps
– Top Right Red button… ‘Add-Test Sitemap’
– verify https for domain and add sub/ sitemap.xml (or appropriate)
? Run ‘Test’ first (click view results)
? Run full submit of Sitemap (click refresh page)
– Once test shows no errors, return to Submit Sitemap and re-enter and this time use ‘Submit’
– You should get a page that notes pages submitted.
Note: Resubmit Sitemap from within the WordPress platform… eg., Google XML sitemap >submit
Robots.txt test and update as necessary…
Refresh the robots.txt setting in the https domain with the relevant changes.
Note: Make sure the https based robots.txt is not disallowing everything. If it is, stop it, then wait a few weeks to let the https site get indexed. In fact, once https is enabled, wait a few weeks before you redirect and force bots to switch.
> Fetch and Crawl new property in Search Console
– Homepage https in both, desktop and mobile
– request indexing of both newly crawled site
– Select in Left-hand column > Crawl > Fetch as Google and submit your main https homepage in both, Desktop and Mobile. (Note: you may get a Partial return while https is being migrated)
Edit Domain http to now be https in Google My Business, BING, et. al. (maps) and test your external links.
Check some existing external links pointing to the site to verify that they go to the new HTTPS version
– Also test some Social Media profiles links, etc.
> Within a week after https certificated install…
– Return to Analytics to verify data retrieval is working properly
– Return to Search Console to verify ‘Indexing’ has been approved
Once you’re confident the site is fully SSL, be sure to set up HSTS and get on the Google Chrome pre-load list.
Note: technically, when a request is made, Google Chrome will ONLY request the HTTPs version of anything on your domain. That means no redirects are attempted if someone is going to your site in Chrome.
Note: Use this URL for testing HSTS
https://hstspreload.org
Also Images…
Very often people miss making images https compliant. And with Chrome now SSL shaming everyone it’s important to check and fix everything.
Hint: This additional plug-in could come in handy for cleaning up any outstanding unsecured images…
https://wordpress.org/plugins/ssl-insecure-content-fixer/
Go To Google My Business & BING places for business (for this same website)
– On the Home page > Select and Edit > Your website location to now be https//(your website)
Follow-up Testing…
SSLLabs.com
***
If you’d prefer, let us install your SSL certificate and save you the hassles…
Contact us with the form below…
***
Want this done for you, or at least some free tips on how to do this yourself?
Contact us via phone or text @ 970-335-9580